Garden Tour, April 2013

Join me as we take our periodic stroll around the garden!

Junior High students often change the message on the blackboard hung in their garden.  Yes, welcome indeed!

IMG_6194

I might have mentioned we are planting a lot of peas to get ready for our first Harvest of the Month program in May.  (Pinecones are to discourage critters from walking in the bed.)

IMG_6220

As we were harvesting the broccoli, one child told me she didn’t know that the part of broccoli we eat is curled up flowers. I told her we’d leave one plant in the ground to flower so she could see for herself.

IMG_6222

Broccoli is also coming up in one of our container gardens.  That’s one of the funny things about school gardens—mystery plants!  (Someone, at some time, had an idea, a vision, a spare plant…who knows?)

IMG_6226

The strawberry plants look luscious.  Keep. meaning. to. enclose. them. in. nets.

IMG_6214

The tulips are finally up in the breast cancer awareness ribbon.  Watching them bloom took on new meaning for me this year as two very brave and beautiful friends of mine have kicked cancer’s butt in the last year.

IMG_6282

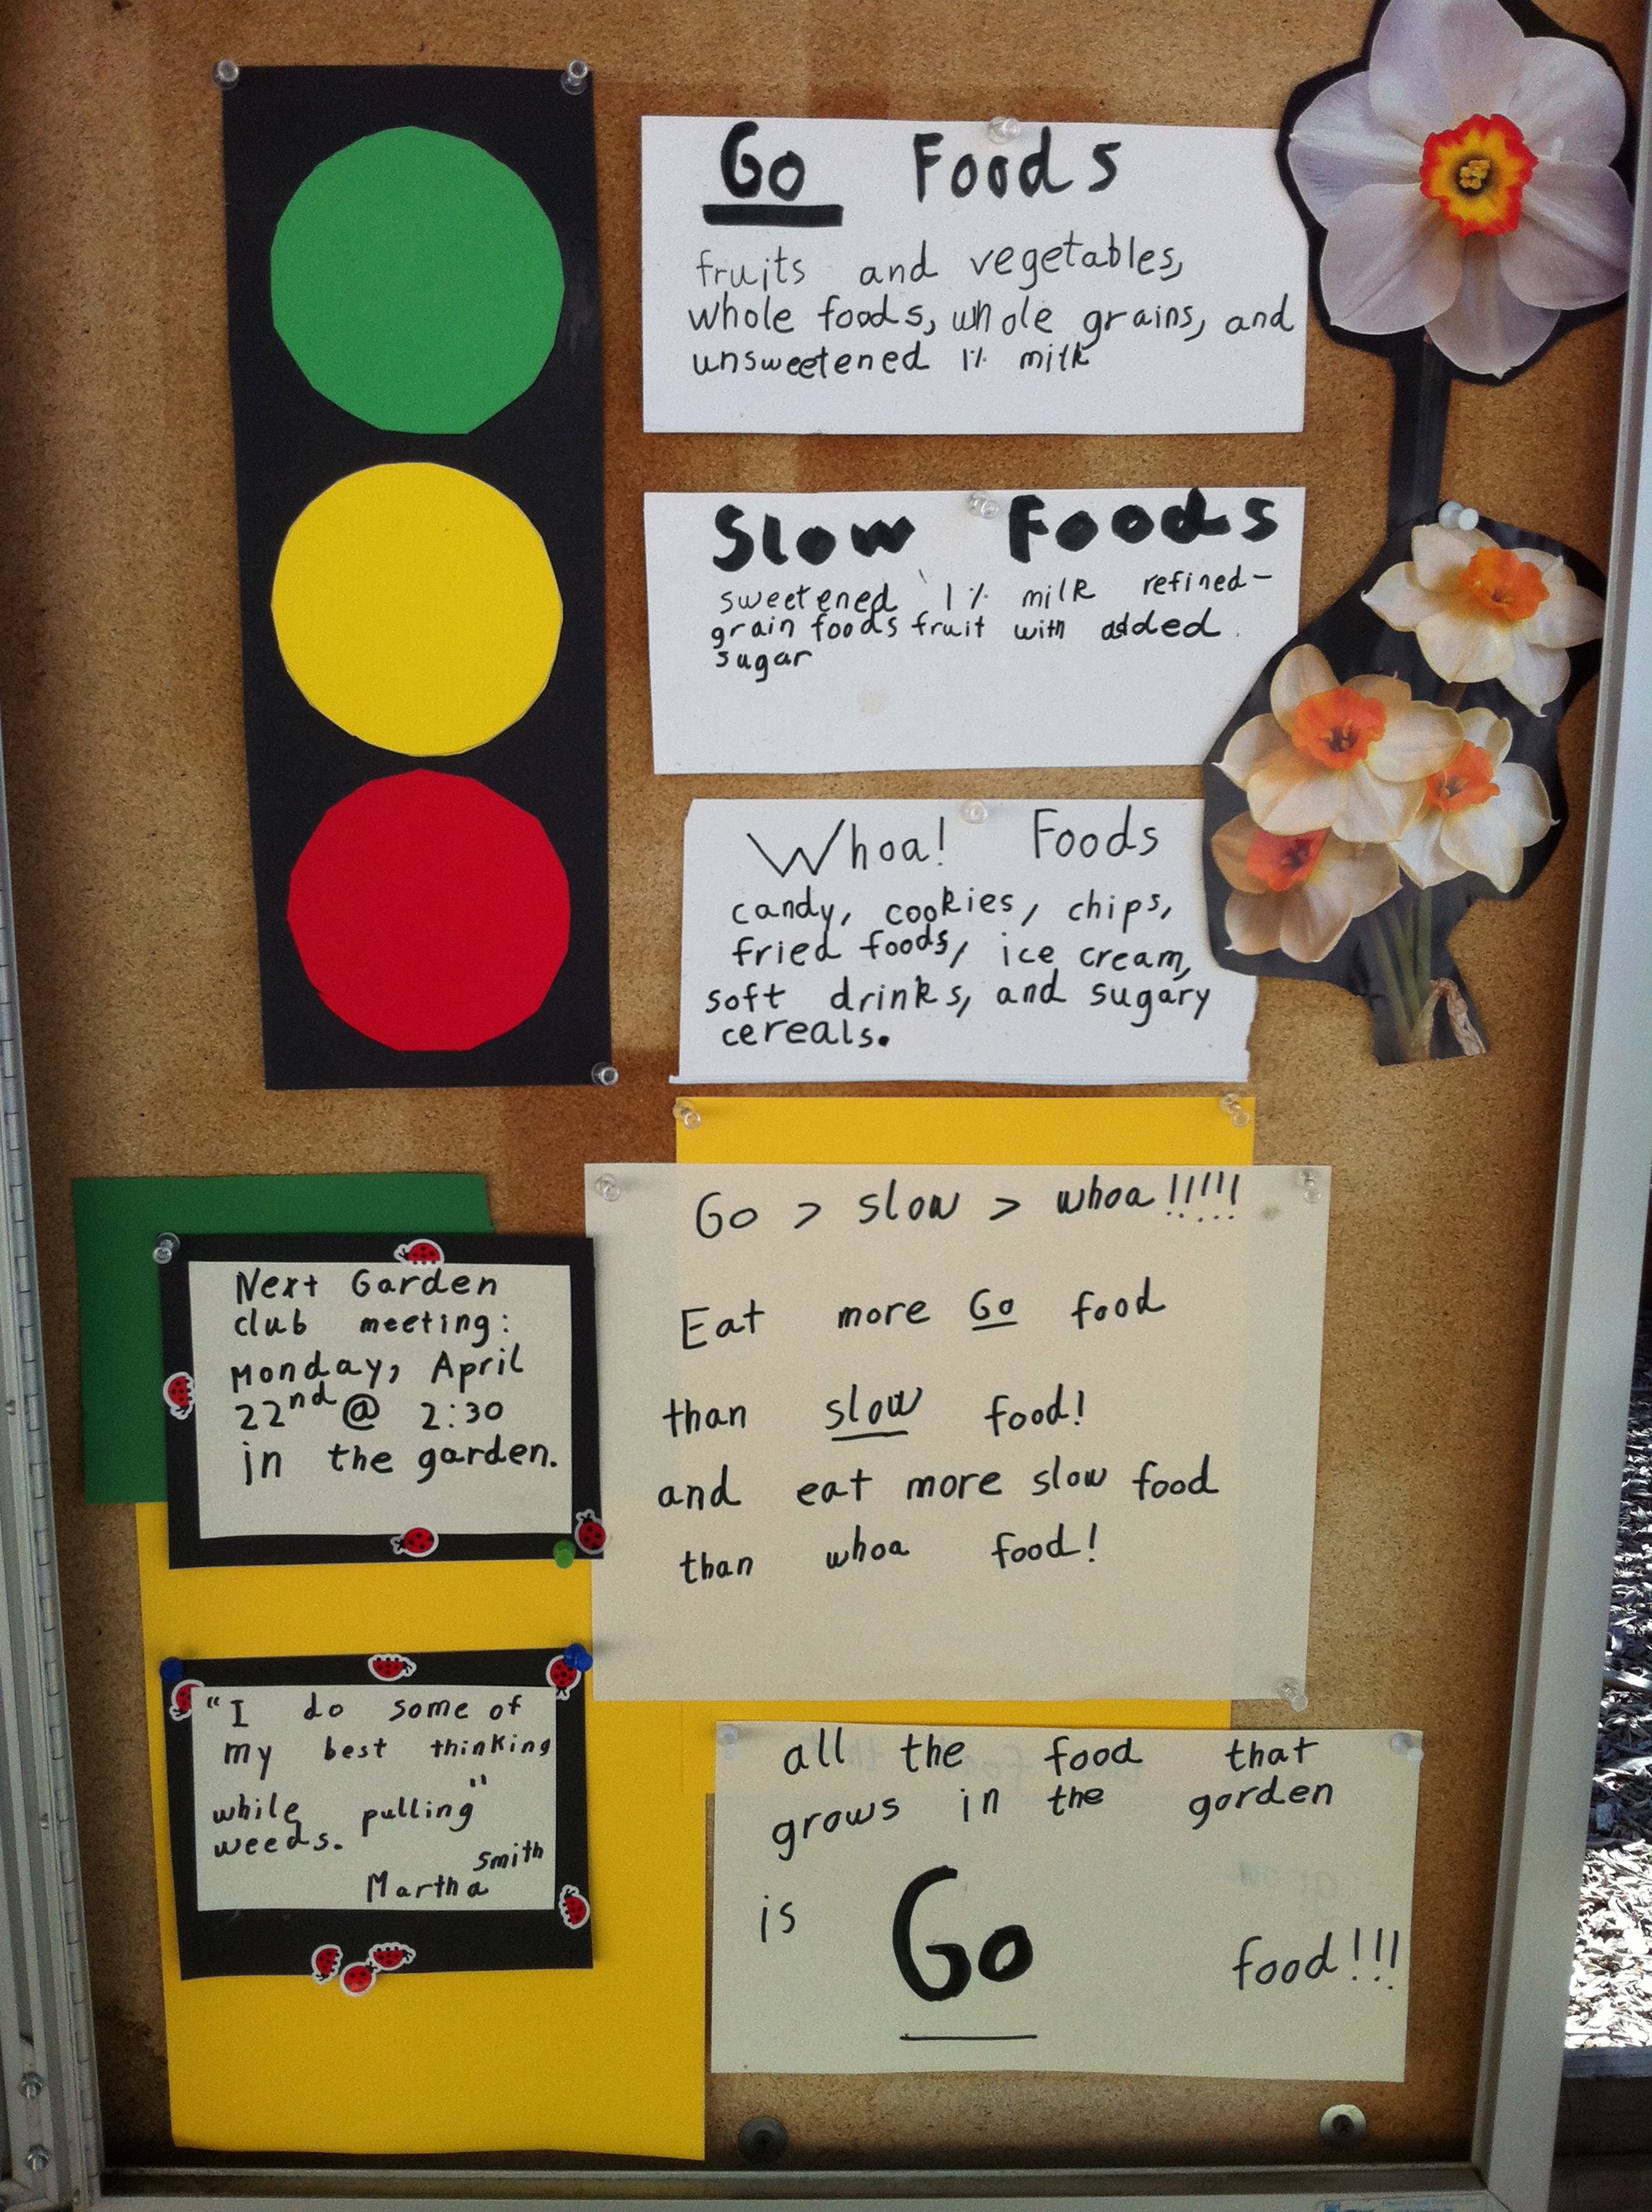
New child-created signage on the bulletin board on the CATCH nutrition concept:  go, slow and whoa foods.

IMG_6269

We’ve been moving native strawberries out of this prime veggie growing location to the hillside around the fruit trees, as a move toward a permaculture fruit tree guild.  We hadn’t moved all of them by Science Day though so I split the bed to make some room for pea planting, pinning back the strawberries with some white picket fencing we keep moving around the garden.  Cute!

IMG_6290

Someone donated this flag last year, and we fly it—announcing our allegiance to daffodils!

IMG_6298

Mrs. Shull’s fourth grade class peas.  Each child did a letter on an index card, I laminated them and kids taped them to bamboo skewers.

IMG_6284

We have a gazillion wildflower seeds in the garden, from seed ball making activities, former projects, etc.  Wildflowers have a special immunity in our garden.  Wherever they want to pop up, we gladly let them stay.

IMG_6305

This little donated table broke.  No worrries. With a tree stump standing in, it makes another cozy little spot to hang out in the garden.

IMG_6273

A local grape grower trimmed these for us!  Our first crop this fall?  (Stay tuned.)

IMG_6288

Look who decided to bloom.  (Oh little wisteria, you have no idea how close you were to being uprooted.)

IMG_6262

Our honeysuckle reading teepee.  Last week a child sitting inside yelled, “Mrs. Elisara!  Come here!  There’s a chrysallis at the top of the teepee!”  Sure enough, a butterfly-to-be was dangling from the ceiling.  (The president of the entomology club later ID’ed it.)

IMG_6261

If you’re not familiar with Box Tops, they are the little pink coupons found on hundreds of products.  Schools collect them and mail them in, receiving 10 cents for each one.  It adds up, and at our school, the proceeds have been earmarked for the garden.  Twice a year we receive a check.  Here’s what we bought with our latest earnings: pea trellises, bean towers, seed starting mix, trays, compost, and our 3×3 raised bed frame.

IMG_5976

Finally, it’s always good to step back and get the big picture!

IMG_6276

What’s worthy of a 100th post? Compost!

The glories of compost….much ink has been spilled on this everyday miracle.  Scraps of food that transform into “black gold” with leaves, water, air, time, and microbial mechanics. It’s poetry pay dirt, and it happens under our noses.

Our compost system at school is a passive system.  In other words, we don’t get around to turning it very often and only harvest it about twice a year.  Nonetheless, the magic still happens.

Garden Ambassador turning the bin with a pitchfork at recess:

IMG_6131

Fourth grade students sifted the bottom layer of the bin into the wheelbarrow using stacked plant trays.

IMG_6210

Ladies and gentleman, I present to you: the fruit and vegetable leftovers from Julian Elementary, ready for our next planting!

IMG_6212

Science Day in the garden

Last Thursday was Science Day at our school during which students went from “station” to “station” spread across campus for science-based lessons.  For example, San Diego Country Office of Education brought their traveling Splash Lab (microscopes and chemistry experiments) and Green Machine (soils, integrated pest management, water cycle) programs.

IMG_6153

Almost every student passed through the garden for a 30-minute class.  In the morning, we had the younger classes combined by grade so I divided the children into groups with an adult (teacher, parent, and/or aid) and explained that they would go to 5 different stations for 5 minutes each.  Each station was set up with a clipboard of simple instructions and the necessary equipment.  I went from group to group to answer questions, point things out and re-set materials.

Station One:  Planting Peas

IMG_6147

IMG_6161

Station Two:  Watering peas

Other classes had already planted peas in other beds.  At this station kids observed their growth and watered.

IMG_6145

Station Three:  Storytime

IMG_6135

IMG_6154

Station Four:  Smelling herbs

IMG_6137

Station Five:  Looking for habitat elements

IMG_6139

Mrs. White demonstrating how our beautiful fountain turns on when she holds the panel to the sun.  A wonderful day for hands-on learning!

IMG_6178

Daffodil show: win-win-win-win…

This past weekend was the annual Daffodil Show in Julian.  (Last year I gushingly detailed all of the reasons I love this community event here.)

After a brief chat on Friday about how to choose a prizewinning bloom, the students spread out to harvest.

IMG_6058

IMG_6050

IMG_6068

What to choose?

IMG_6070

Then after school I took my boys home to pick their personal entries.

IMG_6079

Ethan almost backed out this year but decided to enter again after listening to his mother go on and on about the importance of tradition. (A fistful of ribbons, including a “court of honor” distinction later, he was glad he followed through, and I made him promise to do it every year until he graduates high school.  We’ll see.  Elliot’s in, for sure.)

IMG_6081

A friend visiting from out-of-town jumped right in on the excitement, watching the boys key out and arrange their flowers.  (The paper flowers hanging from the ceiling and the watercolor paintings on the wall were all done by kids at school.)

IMG_6083

The youth division took up one full wall with a record amount of entries.

IMG_6096

IMG_6087

IMG_6189

Photo courtesy of Anne Garcia

Marisa’s beautiful display with children’s essays.  The photos are of kids planting at school and around town—a yearly tradition led by Sally Snipes.

IMG_6186

Photo courtesy of Anne Garcia

The ribbons and some of the flowers are now proudly on display in the front office of the school.

IMG_6117

My friend Anne summed it up well in a post-show e-mail:

I think the Youth Division MAKES the show! It adds so much pizazz and meaning to why we grow the flowers. Pure joy!

3×3 bed: a how-to

I’ve never paid much attention to square foot gardening, despite Mel Bartholomew’s book being the bestselling garden book of all time.  Until now.  I recently bought his book, read it all, and decided to build our next set of raised, edible beds along the square foot model.

Although his basic idea is to build a 4×4 bed, he recommends 3×3 for children.  Pictured below is a 3×3 frame made from cedar wood.  I purchased pre-cut pieces that fit together with little dowels (Amish-made, a closeout item on the SFG website) in the interest of time and simplicity.  I’d like volunteers to build 6 more of these, so I wanted a model.  Needed: four 3 foot, 6 inch boards and something to attach them at the corner—nails, screws, corner fittings, etc.

IMG_5947

Then I gathered “hardware cloth” (a wire mesh sold in rolls of 1/4 and 1/2 inch squares), wire cutters, gloves and a staple gun.

IMG_5958

I cut a piece to cover the bottom of the frame and stapled it every inch or so along the perimeter.  Take that, gophers.

Then I made an “exclusion device.”  I bought four 3/4 inch pvc pipes.  I had the nice man at Home Depot cut them into thirds.  I then had two of the thirds cut again.  I bought 8 elbow pieces and four connectors.  Then I told my oldest boy there was a project in the garage that would draw upon his long history of lego-building.

IMG_5966

I also bought white duct tape (weatherproof) and repurposed some infernal bird netting (pictured above, bottom right corner.)  I taped a panel of netting from one side over the top to the other side, and then cut pieces to size on the remaining sides.  This is to keep out birds, cats and gophers.  It is easy to lift or tip back for access.

IMG_6023

Students filled it with store-bought organic compost.  (Apologies to Mel–he insists on a particular formula, but I think I met the spirit of the law by buying super high-quality, blended compost.  Doing all the mixing from scratch at school was just a bit much that week.)

The square foot method goes like this:  Think of plants as S, M, L and XL.  In each square you can put:

One XL plant, like broccoli or a cabbage

Four L plants, like swiss chard

Nine M plants, like beets

or

Sixteen S plants, lilke radishes or green onions.

You can mix it up with squares planted with different size plants , and then simply replant each square as it produces.  (Google square foot gardening images, and you’ll get an abundance of photos, charts, and diagrams.)

We planted spinach, so we put nine seeds in each square, in evenly-spaced rows of three.  Each row has a different variety so kids can see them growing side by side.

IMG_6024

Our hope is to build more of these to put in the last remaining sunny strip in the garden. I feel hopeful about them because they are small, manageable and unintimidating, and the concept is easy to get one’s mind around–therefore, potentially increasing the number of classes growing edibles.

TRUTH:  I am neither experienced nor skilled in the “construction” side of gardening.  Doing a simple building/maintenance-type errand at Home Depot usually makes my hands go all clammy.  Because I hope to not only promote gardening at school but also in my community, I wanted to do the whole thing by myself to prove….if I can do it, so can you.  (It’s true!)  Reading Mel’s book will give you all the info you need.  (All New Square Foot Gardening, 2013.)

Do you have experience with square foot gardening?  Do tell!

Seed packet literacy

To continue with my pea-brained ideas….

For Wednesday’s garden class, I had the class plant a bed of peas.  Before we went out to the garden, we talked about “how to read a seed packet.” I copied the front and back of a packet and added questions around the perimeter.  This was our opening activity.

IMG_5859

Notice how the students have to look closely for the information in order to answer the question.  To answer the question on trellises, they have to notice the adjective “self-supporting.”  To know what days we should expect a pea, they have to find the “days to maturity.”

Then I gave each child a different seed packet.  (I have lots, obviously.)  I then asked them to form a line across the room, based on the name of their flower/vegetable, in alphabetical order. They had to talk to each other and shuffle themselves, A to Z.  When they were in place, I asked them to read off their seed name, to see if we got it right!  Then we did it again, according to “days to maturity” with one end of the spectrum being the shortest, the other the longest.  It was fun to compare radishes at one end with onions at the other.

IMG_5993

At that point, we had to get planting, but you could keep going with this game, having the kids line up according to planting depth, Latin names, months to plant, etc.  Each one will demonstrate the different needs of plants as well as help kids look closely at all that information on a seed packet.

The most beautiful broccoli…

….is (of course) the broccoli you grow yourself!

One of my Garden Ambassadors harvested the broccoli yesterday.

IMG_5880

And after thorough washing, it went back to the classroom.  From stem to mouth in the same afternoon!

IMG_5886

P.S.  Today I saw some of the fifth graders, and I asked them how they liked the broccoli, compared to other broccoli they had eaten.  One said, “More moist.”  Another said, “Fresher, sweeter.” A third summed it up: “It tasted more green.”

They also said the teacher offered seconds, and the kids rushed the bowl.  (Who says kids won’t eat vegetables?)

Love me a good mission statement

In my role as “school garden consultant” through Master Gardeners, I am now working with three schools.  The school I met with recently in San Diego is just starting off with their project, and I am excited because they have all of the ingredients for an amazing garden: a supportive principal, a passionate lead teacher, other interested teachers, potential community partners, possible funding and an amazing space (Flat, sunny, with water!  Oh my!)

IMG_5830

As y’all know, good projects start with a mission statement.  Some people find this part of the process tedious and kinda academic, but not me. How do you know what to do if you don’t know where you want to end up?  As such, I like the process of writing out objectives.  It helps keep me on track, sort our priorities, and assess progress.

Here is ours.  We are in process of having an artist transfer this to a large sign for the garden, reminding us all of what we’re growing…

What we grow in the Julian Elementary Character Garden

We grow food.

We promote good nutrition by planting, tending, harvesting and eating organic fruit, vegetables and herbs.

We grow citizens.

We connect children to the natural world and create environmental stewards.

We grow character.

We learn leadership, responsibility, and respect when we work in the garden.

We grow practical gardening skills.

We learn the nuts and bolts of growing a garden.

We grow beauty.

We enjoy our peaceful, beautiful garden as it relaxes our bodies, inspires our minds, and ignites our creativity and imagination.

We grow academics.

We study biology, ecology and natural history in our garden classroom.

We grow stories. 

We develop a “sense of place” as we build a garden that reflects who we are as individuals, as a school and as residents of Julian and the backcountry.

We grow community.

We  create positive relationships among students, staff, parents and neighbors when we work together. 

5 reasons to mind your peas

Peas are perfect in school gardens because:

1)  They come in their own wrappers.  In terms of food safety—-winners!

2)   Peas are one of those foods whose “fresh” version and “canned” version are radically different.  If you’ve only had those nasty little canned ones, fresh peas seem like a whole new food.

3)  You can’t plant enough peas.  My experience is that kids love to search for them on the vine, pop them open and eat.  Every year I plant them I resolve to plant ten times more the following year.

4) As nitrogen-fixing legumes, you can chop up the plants after they’ve produced and dig them in to improve the soil.

5)  Peas can be put in the ground early (Valentines Day here in Julian) so kids can plant and harvest during the school year.  (Because some vegetables ripen in the summer, plants whose entire cycle can be observed during the traditional school calendar are great.)

As part of our “emerging” Farm to School program, I am working to choose a “crop of the month” for our school and align it as much as possible with a planting and harvesting schedule for the garden.  We will also be incorporating the excellent matching resources of “Harvest of the Month” in garden lessons.

Naturally, our first crop will be peas for May.

To start, I bought every variety of pea I could find!  Here are a few:

IMG_5796

More pea-brained ideas to follow…..

“Be Wise” partners with our Farm to School efforts

“Be Wise Ranch”* is an organic farm in San Diego that runs a CSA program (community supported agriculture.)  In a CSA, members buy boxes of produce, often organic, directly from a farm on a regular basis.**  For a couple years I have been a member of “Be Wise”, and our little Julian group takes turns in picking up all the boxes once every two weeks and then delivering them to the other members.

Today I called and asked if, in conjunction with our regular pick-up, the ranch would be willing to donate an extra box of produce to our emerging Farm to School program.

Within minutes, they wrote back and said “absolutely.”

Let me list the ways in which this is a very cool development for our F2S efforts.

  • I can use produce in my Farm to School lessons, as in the citrus class I recently held.  Financing these lessons is a challenge, but now we will have a regular donation of organic food to use.  It’s a great start.
  • Garden Ambassadors love doing taste tests!  I can imagine receiving our box, and then working with them during lunch and recess to either cook with it or prep it raw.  Every month we will have a wide variety of fruits and vegetables to introduce to the children in small bites.  For example, this week’s box includes bok choy, cauliflower, carrots, collard greens, grapefruit, kale, romanesco, lemons, lettuce, blood oranges, tangelos, radishes and strawberries.
  • All of the food is already sourced locally and certified organic.
  • Working with Be Wise helps us get the produce efficiently.  Our rural isolation is proving to be one of the biggest challenges in implementing F2S programs, and so it’s a relief to use an “existing channel of distribution” (i.e. our group already picks up regularly “down the hill.”)
  • Even though we will continue to use our garden produce for classes and taste tests, there are many things we will never be able to grow at our altitude that we can still introduce to the kids through the Be Wise produce.
  • We have a short growing season, and donated produce means we can keep the flow of fruits and vegetables coming even when our own growing space looks like this:
IMG_5772

Taken today!

*For more information on Be Wise Ranch, please visit http://www.bewiseranch.com

**For more information on CSA’s, see http://www.bewiseranch.com/csa.htm